

Planning Your Program
Although it is possible to write a program using the "trial-and-error" method, planning gives you several advantages. It minimizes rewriting, and generally results in a more efficient program. A well-planned program is also easier to modify and is less likely to contain errors.
Step 1: Define The Problem
Clearly defining the problem minimizes the time you will spend developing a solution. In defining the problem, try asking the following questions.- What elements of the problem are already known?
- What information must be supplied from the keyboard as the program runs?
- What elements of the problem must the program calculate?
- What types of calculations will be necessary?
Step 2 : Develop a Solution
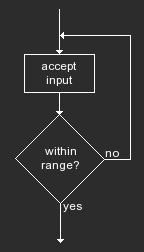
A complex problem can be simplified by breaking it down into "modules", or program segments, that each deal with a specific task in the overall solution.A device called a flowchart can help you design modules and show relationships between modules. A flowchart uses symbols to illustrate the planned solution. Generally, a rectangle is used to indicate a task and a diamond is used to indicate a test.
Step 3 : Determine Messages and Prompts
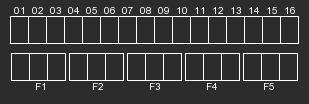
Try to design messages so that they consist of 16 or fewer characters. Although you can create a message of as many as 80 characters, short messages are easier to read.You may find it useful to draw templates such as the one below to record planned messages, columns for merged numbers, and function-key labels.
Step 4 : Determine Memory Allocation
Large programs ( and some small programs that generate long lists of data ) require careful allocation of available memory.At this stage of planning, you should:
- Determine the approximate amount of memory our program will occupy. Plan to partition enough program memory to allow for possible modification of the program.
- Determing the number of registers the program will need for stored alpha messages and for numeric values, such as counters and results of calculations. Record the planned location of each message and value. Plan to partition enough data registers.
After developing a solution and deciding on messages and memory locations for program data, you are ready to translate your solution into a sequence of program instructions.
Step 5 : Write the Program Steps
You should now be ready to write the program on paper, translating each symbol from the flowchart into a sequence of instructions. Writing the planned program steps on paper lets you use your own form of "shorthand" and lets you include comments about what the program does at each point..
.
LABEL AA //POINTER ADJUST ROUTINE
recall 015 //Get pointer
+ recall 016 = //Add offset
store 017 //Store pointer + offset
.
.
.
You can use these written steps to mentally test the solution before entering the keystrokes. If you find that you are repeating the same sequence of program instructions, consider using the sequence as a subroutine.
Step 6 : Enter the Keystrokes
When you are satisfied that the program instructions will accomplish the program's task, the next step is to enter the keystrokes.While translating the written steps into keystrokes, remember to use the [ 2nd ] and [ INV ] keys as necessary. For example, if you have written an instruction as LABEL AA, you must press [ 2nd ] [ LBL ] AA. For a listing of instruction mnemonics and their corresponding keystrokes, refer to Appendix C.
Step 7 : Test and Edit the Program
After you have entered the keystrokes for your program, test the program by running it. In many cases, the program will contain errors and will not run correctly the first time.If the program does not stop after a reasonable time, press [ BREAK ], and then press [ LEARN ] { PC } to display the part of the program that was executing when you pressed [ BREAK ]. (You can also insert BRK as a program instruction to periodically check the progress of the program.) After exiting the learn mode, you can turn on the trace function and press { GO } to resume program execution. When trace is on, the calculator displays the program mnemonics and the audit trail as the program runs. If you have the printer emulation enabled, the mnemonics and audit trail are also printed.
You can activate trace either from the keyboard or from within the program itself. If you have isolated the problem to a particular segment of the program, insert a TRC instruction before the segment and an INV TRC instruction after the segment.
If you only need to see a specific value or message to determine that your program is running correctly, you may prefer to insert a PRT or PAU instruction rather than tracing each instruction.
If you want to examine a labeled instruction or an instruction whose program step you know, you can use [ 2nd ] [ GTL ] or [ INV ] [ 2nd ] [ GTL ] from the keyboard to set the program counter to the desired step. Then press [ LEARN ] { PC } to display the instruction.
Continue to test and edit until the program runs correctly. You should test the program using "worst case" data to ensure that it can handle a wide range of situations.
Step 8 : Save and Document the Program
When your program is finished, you may want to save it as a file (either in the calculator's file space or in a Constant Memory™ cartridge, or in a file in the external file storage. From the external file storage area, you can sync and share your programs and data with your computer and from there, anywhere.)You should also prepare any written documentation for using and maintaining the program. Your written notes and program steps can be useful. If you have a printer, print a listing of the program and its labels.
If you will be using the program infrequently or if others will use the program, it is a good idea to compile written instructions for its use. This is particularly important with a complex program that requires a good deal of input from the keyboard.
☚ Back